Nothing spoils race day like serious mechanical issues. It’s race season. Hopefully by now you’ve managed to moult off the worst of your thick winter coat to reveal the ripped and starving competitor that lurks within us all. Granted, this mythical uber-athlete is apparent in most other people who are not I – but I continue to live in hope.
Regardless of your form, or lack of it, you can at least turn up with your bike looking like it wants to go to the races. If you do this right it should look a lot like a trip to the spring racing carnival. You arrive in your best suit and trendy tie/revealing dress and fascinator. You leave the races looking slightly worse for wear. With that analogy in mind, pull your bike out of the garage (it belongs in the bike room, you fool), and make sure that she is ready for race day.
Get your bike properly serviced
If you can do this yourself, do it. Don’t talk about doing it, actually, do it. I’m not going to explain servicing here. If servicing your bike is not really your thing, then go find your friendly bike mechanic, take the Elizabethan collar off his head, ask him to stop licking himself and get your bike serviced. Once this is done, take your bike for a test ride before you pack it, just in case. It’s easier to fix things or alter adjustments to your preference before you fly off to a distant country to indulge your wildest tri fantasies. All the race prep information that we are about to discuss assumes that the bike is working properly.
Clean your bike
Nothing says ‘I’m ready to race’ quite like a clean bike. The old race stickers need to be removed within 56 hours of finishing a race. Ironman race stickers can be left on for 72 hours and the silver Kona sticker can remain forever. However, if you still have old race numbers, gel-vomit and other mank adorning your cockpit, shame on you. Go clean your bike. I get asked a lot about how to wash a bike – the same way you wash a dog. Warm soapy water and a sponge is a good start. No harsh chemicals and no high-pressure water are two rules you can take to the bank. That footage of the Tour de France where you see the the pro tour mechanics hitting the bikes with the high pressure blaster…those guys don’t pay for the bikes and they expect them to last about five weeks. Assuming you want your bike to last longer then five weeks means you will be nice to it.
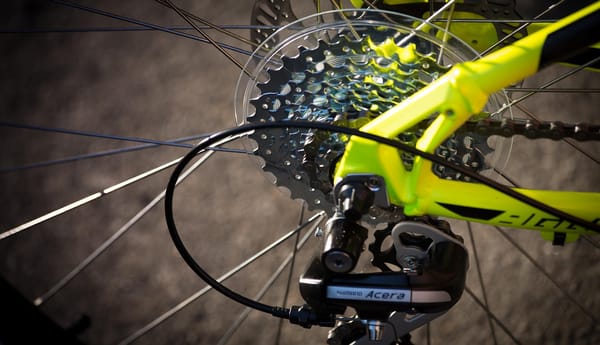
Once you have washed the bike (I prefer to use shampoo rather than detergent), you can scrub the chain, cassette and chain rings with a light citrus de-greaser. You can get this from Bunnings. If you don’t have a cog brush, just use a soft nail-scrubbing brush. Your aim is to get all the sand, grit and old grease out of the chain. Once everything is sparkling, you should rinse the drivetrain really well and run the chain through a rag until it is bone dry. Next, get some light, good-quality bicycle oil and apply a single drop to each link in the chain. You can just squirt it on but it’s much more tantric if you apply it one drop at a time. Also, you will psyche your competitors out with your focused bicycle Zen. Once the oil is on the chain, run the chain through a clean rag until you have removed nearly all the oil. The chain should be shiny clean with just a hint of oil through the links. Aside from looking good, a clean chain with light lube reduces friction, saving you a few watts.
Race wheels and other stuff
Do not just jam your race wheels on. If you do not possess race wheels, go and buy some. The speed gains are minimal, but it has nothing to do with speed. Neither you nor I will win the race, so don’t whine about the cost-to-speed ratio of race wheels. We do not fit race wheels because they are fast, we fit them because they are cool. Once you’ve bought some race wheels (the more expensive, the better), we can continue the race prep. Fitting your race wheels is best done as part of the pre-race service. Your race wheels are probably a different width than your training wheels, have the braking surface in a slightly different spot and will usually require re-tuning. No two wheels are dished exactly the same, so failure to get your race wheels properly set up can mean a race-ending mechanical failure such as a rear derailleur spat into the spokes of your rear wheel. Fit carbon pads. Do not mix your carbon pads with your alloy pads. Ever. You do not enjoy cheese with ice cream, so don’t mix your brake pads. Make sure your rear brake is looser than your front brake and that neither brakes can rub on the wheels. It’s a race – you don’t need to stop (ok, so you might need to stop, but make sure your fatter carbon wheels are not hitting the pads when you are out of the saddle).
Now, fit all the other crap you think you will need on race day – front-mounted bottle cage with straw, Bento box, salt stick dispenser, rear-mounted duo bottle hydration unit, spares pack, spare CO2 cartridges and tape at least 10 gels to your top tube. Next step, remove all of this stuff apart from one bottle cage and the spares pack. Never race with lights still attached to your bike. Not even I go slowly enough to need them. You are preparing a race bike, not a camel, leave all that mess off the bike and just tuck a few gels in the pocket of your tri top. It’s a race, travel light and carry a big carbon stick.
Charge the batteries
Your Garmin, power meter, heart rate monitor, electric gears and Google Glass all need power like cross fitters need to kill all their own paleo food in the meat section of Coles. Charge the batteries and avoid cross fit, you’ll be much happier.
Bar tape and rattles
If you ride your bike on a regular basis, you need to change your bar tape at least every six months. Every three months is better. Bar tape is like clothing. It goes next to your skin and it gets dirty. You wouldn’t wear your undies for a year without putting on a clean pair, so don’t be disgusting and ride around on filthy old bar tape. It’s a bacteria farm and it will make you sick. For a big race, you will put on clean white bar tape (it’s a real rule from ASADA or something, you can look it up). So don’t be cheap, make sure to keep your bar tape fresh. You can learn to do it yourself or you can make your mechanic strip to the waist and apply it while you watch. Either way, clean and new is what you need.
Next, gently bounce the bike on the ground and go for a test ride. Other than the normal operation of the gruppo, make sure there are no nasty rattles from all the stuff you’ve attached to the bike. The longer valve stems in your race wheels can often make a ticking sound as the wheel rotates. A quiet bike is a happy bike.
Lastly, valve caps on wheels are never acceptable, ever. Remove them and throw them away. They are packaging. Every time a wheel rotates with a valve cap fitted, your bike mechanic dies inside just a little bit more. If you have valve caps that match the colour of your bike, you are doubly guilty. If you notice your friend has valve caps fitted to their bike, you need to put them out of their misery – it’s the decent thing to do.
Once your bike is clean, resplendent with race wheels and free of top tube gels and valve caps, then you know you are ready to race.